

I have created another use for an old book, a dedicated Queen At Home Stationery Folder:

In my folder I also made some pages meant for loose scraps, to use with my correspondence. If you like that idea, the folder could be created entirely to hold scraps, rather than stationery (similar to a collectors stamp album).
This time I have used a large format book, where the pages are larger than A4. Look for encyclopedias and such, if you want to create your own Stationery Folder 😉
Here are the pages from my Queen At Home Stationery Folder:

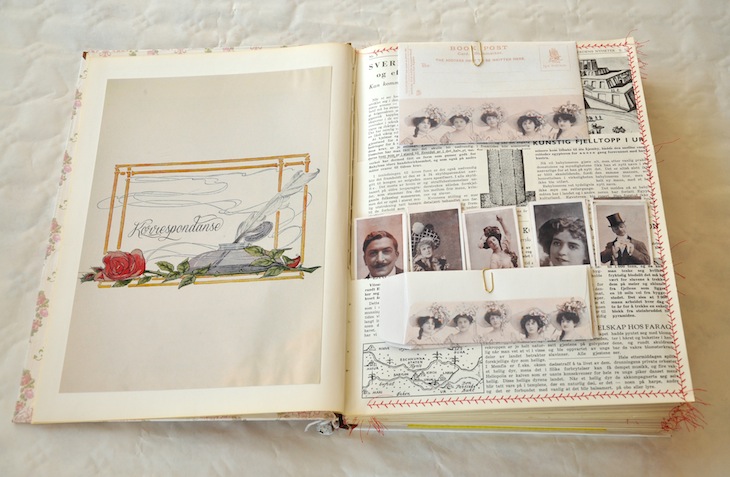


As you can see, I have left the inside original book pretty much unaltered this time, since I thought the pages were pretty interesting with B&W text and drawings. Also, I did not want the folder to steal too much away from the stationery and the scraps, so that when I open it to select my pieces, I’ll be pleased with the folder, but able to focus on the content…lol!
I have designed quite a few different stationery sets since I started WoW a year and a half ago, so I do have several different ones to choose from 😛 I pretty much let the front and back covers, and introductory pages be it for fancy embellishment, and then added the darling embroidery stitches in red with my sewing machine.
If you want to make your own stationery folder, you might as well use plain zig-zag stitches! And if you don’t want stitches, or don’t have a sewing machine, you can also glue your pages together, with narrow double sided tape. You might then want to consider adding some extra tape to the outer edge of each page “sandwich” to reinforce it, I suggest painters tape for a vintage look, rather than shiny plastic tape or washi tape (that would look good but hardly fill the reinforcement purpose). Also remember: the regular painters tape can be painted, gessoed or stamped with ease, if you want to give it a visual “lift” 😀
INSTRUCTIONS:
- Remove half the pages! I have learned since my last book craft, that the best way to do this is tear out out the spreads at the middle seem of the signature! (The signature is one section of spreads sewn together). So far I have done that with 4 different books, and all of those were bound with 4 spreads (8 pages) per signature. If your book is too, all you need to do is localize the stitches of the first signature, and carefully rip out the two inner spreads, one at the time. Then move forward to the next signature and repeat until you have made your way through the whole book. This technique leaves no initial jagged edges inside the book.
- Decide how you want your book to be configurated. If this is your first folder for stationery or scraps, I suggest going with a maximum of two different configurations. My two configurations are:
- SETUP A: 2/3 page and 1/3 page pockets (for stationery)
- SETUP B: two 1/3 page pockets and one 1/6 page pocket on top (for scraps)
- I also recommend planning your pages so the spread (facing pages) is configurated to match
- Creating setup A (starting with left side pockets)
- Start with one whole page
- On the second page measure 1/3 down from the top and draw a horizontal line
- On the third page, measure 2/3 down from the top and draw a horizontal line.
- Attach the three pages together with paper clips. to mark that these are now a sandwich together
- Right side pockets with the same configuration, repeat steps a, b and c in opposite order, and add these to the next sandwich.
- To continue with the same configuration, keep repeating the steps 4 and 5. A complete sandwich A with pockets on both sides of the page, will contain 5 pages sandwiched together.
- Creating setup B (starting with left side pockets)
- Start with one whole page
- On the second page measure 1/6 down from the top and draw a horizontal line
- Also measure 1/3 down from the top and draw another horizontal line
- Also measure 2/3 down from the top and draw another horizontal line
- Attach the two pages together with paper clips. to mark that these are now a sandwich together
- Right side pockets with the same configuration, repeat steps a-c in opposite order, and add these to the next sandwich.
- To continue with the same configuration, keep repeating the steps 7 and 8. A complete sandwich B with pockets on both sides of the page, will contain 3 pages sandwiched together.
- Repeat creating the sandwiches until you have configurated your whole book.
- Then work with one sandwich at the time:
- Open the paper clips
- Insert a cutting mat and cut where you drew the horizontal lines on each page.
- Cut carefully at the spine to remove the excess (top) parts.
- Re-attach the paper clips to keep the sandwich together.
- Repeat steps a-d for all the sandwiches in your book. My original book had 204 pages, I ended up with 13 sandwiches and 3 regular pages (2 in front and 1 in the back)
- Insert first sandwich into your sewing machine and sew the edge seam and bottom seam to close the sandwich. Use the paper clips as you would use sewing pins with fabric, only pause to remove them while you go rather than sewing over them as you could with pins.
- For the type B configuration, sew 2 more seams from the edge towards the spine, to close the bottoms of the smaller pockets. This can be a bit tricky when the book is large, and the space to access the sewing needle is limited. I solved this by sewing one seem from the front of the sandwich, and the other from the back of the sandwich 😛
- Finally I went back and sewed the top seam from the edge to the spine on all sandwiches. This seam is purely decorative and holds nothing, but I liked the finished look of it 😉 For my folder I left some thread, for a fringed look, you can fasten your seems and cut the threads more closely if you prefer! I did not sew on the two introductory pages or the last single page in the book, they still look like regular pages.
- Gesso the outside of the book (or use white acrylic paint if you don’t have any gesso available!) I prefer gesso because it gives more of a textured surface and a bit of “tooth” for decoupaging or painting later. Leave the gesso to dry, preferably over night.
- Decoupage your covers with any paper you fancy. If you want to use my Queen At Home papers for a large book like this, you will have to print them in A3 size (take them to a printshop if your home printer can’t handle those dimensions) Or decoupage with napkins, like I did for one of my Accordion Folders, or alter your cover any other way you please 🙂
- For the introductory pages, I used elements from my latest stationary set with a free font called Sverige Sript Decorated, and I love how it turned out 🙂 Sorry about the Norwegian, it says “Stationery Folder” on the first page and “Correspondence” on the second…lol
- I also punched a hole in the spine about 2 cm from the bottom and tied a little Fairy bell roughly gessoed white too. I love those bells 😀
- If you wish you could also add some closing to your folder, like a button and rubber band closing or pretty ribbons to tie.
- Stock your new/old folder with beautiful stationery and/or scraps :-).
Please tell me these instructions are even remotely possible to follow…:-O I did not take any pictures while I was making the stationery folder, but I could make another one if you want me to visualize any of the steps more clearly…?
All the high quality images of the finished stationery folder are added to the album below, so you can flip through and zoom in on the images if you wish (click on button to see the album):

A Queen At Home Stationery Folder would also make a great handmade gift, for someone you know appreciates old fashioned snail mail correspondence 🙂 You could add just a couple of different sets of stationery and leave most of the pockets open, for them to fill with their own favorite pieces 😀


I still have a few more old books to alter, wonder what the next one will become? 😀
Did you enjoy this post? If you are not already a confirmed follower of Wings of Whimsy, please click “Follow” to register and make sure you don’t miss future posts on WoW:
- WordPress-users: in the top left corner of your browser window to register your WordPress-account
- Other readers: in the bottom right corner of your browser window to register your email-address
Here is a list of all my previous designs, as seen in the Queen At Home Stationery Folder: (click to see the original posts)
Queen At Home paper set (front and back covers)
American Beauties Stationery (introductory pages & spread 8)
Vintage Celebrity Bookmarks and Envelopes (spread 3)
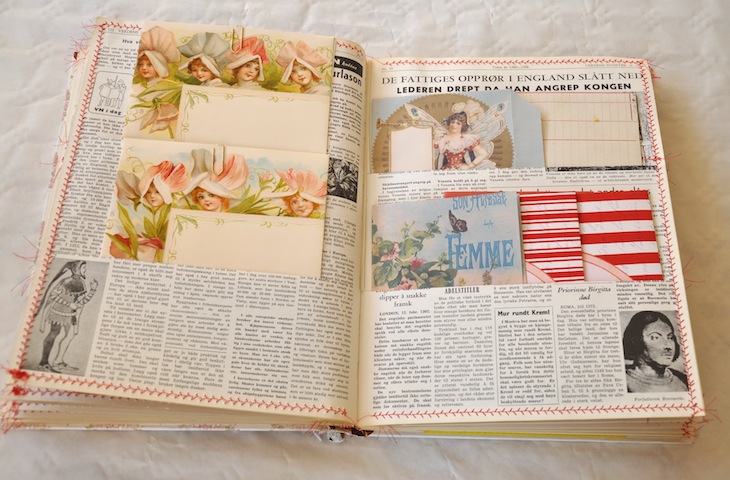
Cherub Rose Heart Wreath Stationery (spread 4)
Cherub Love Letters Stationery (spread 5)
Cherub Love Bookmark (spread 5)
French L’Amour Fan & Stationery (spread 7)
Red Striped Fold & Mail Stationery (spread 11)
French Book Cover Fold & Mail Stationery (spread 11)
Dutch Fairy Fold & Mail Stationery (spread 11)
Rose & Poem Pyramid Gift Box (spread 14)
Cherub Block of Love (spread 14)
")
 Follow me on Pinterest:


Everything you touch is gorgeous. Like magic.
Aaww, thank you so much 🙂 I’m very happy you liked my folder, and hope you feel inspired to alter an old book yourself 🙂 xoxoxo